Get started
The new height adjusting system for the legs makes our new heating plate very practical to use. Read our instuctions to get started right away.
MOUNTING THE LEGS
The legs have a top- and bottom side. This is easy to recognize as the topside is round and the bottom side has a black rubber support. Underneath the heating plate, in the four corners, there are movable brackets marked with “PUSH”. Push on the yellow bracket and move the head of the yellow leg from underneath the heating plate through the hole. Release the bracket when the preferred height is reached. Make sure that all legs have the same height.
TO USE THE HEATING PLATE
Put the plug in the power supply (220-240VAC). The red LED will light up. It will take about one hour before the heating plate is completely warm. Now you can place the chicks underneath the heating plate.
WHAT’S THE BEST HEIGHT FOR THE LEGS?
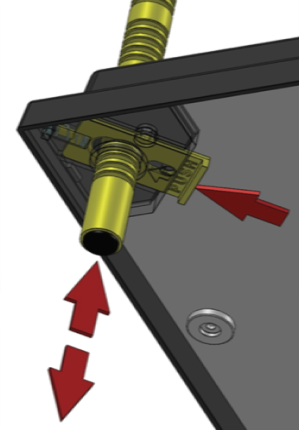
Push on the yellow bracket and move the head of the yellow leg from underneath the heating plate through the hole.
Important to know is that a heating plate is not a heat source like a heat bulb. A heat bulb becomes very hot and radiates the heat downwards. A heating plate is completely different, as only the surface of the bottom side of the heating plate is warm. It is important that the chicks can touch the heating plate, especially when they are new born. For that reason the height adjustment is very crucial.
A good indication of the right height are the chicks. They show when they are satisfied. When they “peep” they are not satisfied. When they are silent and lay down relaxed they are satisfied. For the height adjustment, a good indication is the back height of the chicks. This has to be adjusted at least once a week as the chicks grow. The minimum height is 3cm from the litter.
HOW DO YOUR CHICKS SHOW THAT THE HEIGHT OF THE HEATINGPLATE IS CORRECT?
Good height: The height is correct when the chicks lay down underneath the heating plate and a few are standing. They give a satisfied impression and don’t peep. Sometimes they leave from underneath the heating plate.
Too high: When the heating plate is too high, the chicks are standing and won’t leave from underneath the heating plate. They “peep”.
Too low: When the heating plate is too low, the chicks won’t go under the heating plate as it is too warm. It is difficult to get underneath the heating plate, because the height is too low.
Some users think they need to use a thermometer to check the temperature underneath the heating plate. This is incorrect and not necessary. You don’t put a thermometer under a brooding hen either. The behaviour of your chicks shows you if they are satisfied or not. It’s important that you frequently check their behaviour.
HOW TO CLEAN YOUR HEATING PLATE AFTER USE
After each use cleaning is required with a wet cloth. If necessary, first clean the surface from any dirt with a scraper. Do not use water and don’t keep the heating plate under water.
Safety facilities
We care about your safety. This heating plate has 2 safety facilities to avoid short circuiting and overheating. One is a resistance fuse 0.5Amp and a temperature fuse of 120°C.
IMPORTANT
Bear in mind to use this heating plate as intended. It should be used horizontally with topside up (see picture on the packaging). The 4 legs have to be used as indicated. The minimum height is 3cm above the litter. Any other use (including when the product is opened or any change is made to the cable) or use without the legs, leads to the warranty being invalid and exceeds the responsibility of the producer.